Introduction #
The expenses feature allows companies to record money spent in running their business. By entering expense information, companies can have an overview of where their money is going and run reports to see an overview of aspects of their cash flow. Additional information on categorizing your expenses can be found here.
The expenses feature can be found in the left menu:

Create a New Expense #
To create an expense, navigate to the Expenses main feature page.

Once the page opens, click the + New expense button in the top right.

This opens up the New Expense page where you can fill out all of the expense details. Any field in red is a required field:
Date
Enter the date that the expense occurred. By default, the date will autofill the current calendar day.
Amount
Enter the amount of the expense minus tax.
Payment Type
Click to see a dropdown where you can record the payment method used for the expense.
Tax
Enter the amount of tax paid as part of the expense.
Description
Enter a brief description of the expense for your records.
Type
Enter the type of expense.
Reason
Here you can enter an explanation for the expense.
Category
Click the field to see a dropdown of available expense categories. For more information on adding and managing expense categories see the section here.
Recipient Name
A dropdown menu to select employee names as the recipient of the expense. Useful if the employee used their own money and needs to be reimbursed.
Approved By
Click the dropdown and you can see all of your active store employees to choose from. You can also start to type an employee’s name and then select them from the dropdown.
Expense Note
Any additional internal notes about an expense can go here.
Remove Cash from Register
If an expense is being paid in cash, you can click the dropdown and select which register the cash is being removed from. For more information on cash register’s see documentation here.
Pop Open Cash Drawer
Click to have the register’s cash drawer open. For more information on cash register’s see documentation here.
Add Files
Here you can upload any file format to attach to your expense record.
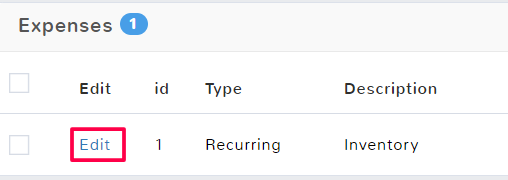
Edit an Expense #
To edit customer information navigate to the Expenses main feature page.

Once the page opens, locate the expense you need to edit the information for, and in the Actions column, select Edit.
This will open the Update Expenses page. Here you can edit and adjust any necessary information for the expense. Select Save in the bottom right in order to keep the changes made.
Delete an Expense #
To delete an expense navigate to the Expenses main feature page.

Once the page opens, locate the expense you want to delete and click the checkbox to select the row. You can select multiple rows if you want to delete more than one expense at a time. Above the expense list, there will be an option to Delete the expense.
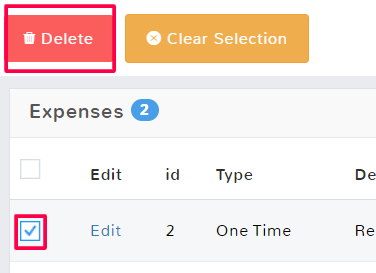
A popup will confirm you want to delete the information. Click OK to delete the expense.
If you deleted an expense by accident, see Manage Deleted Expenses below to recover the record.
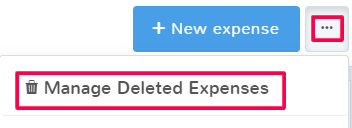
Manage Deleted Expenses #
If you accidentally deleted the wrong expense, you can undo the mistake so long as you have not selected to clean up old expenses. To undelete an expense, navigate to the Expenses main feature page.

In the top right click the ellipses (…) to see more options and select Manage Deleted Expenses.
To undelete an expense and remove it from the deleted section, click the checkbox to highlight the row. You can select multiple rows if you want to do more than one expense at a time. A menu will populate above the list of deleted expenses, select Undelete.
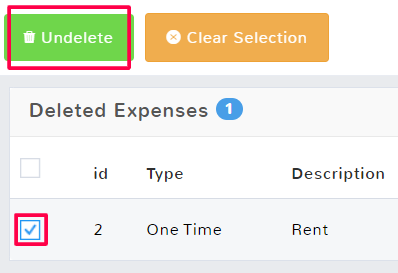
Click Done to return to the normal expenses feature page.


