Introduction #
Sometimes you want to offer special discounts and promotions on an entire group of items in your store. Maybe you’re having a sale on anything from a specific manufacturer because you got a great discount on the last shipment, or it’s the end of summer and you want to clear out your bathing suit inventory with a huge sale, in either case, Price Rules can simplify that process.
Rather than going into each individual item and creating a promotion price for it, you can create a Price Rule that will apply to all items in the groups that you select such as by tags, categories, and manufacturers. You can even select random items or item kits and put them into one price rule to save yourself time editing individual items should the sale change. You even have the flexibility to create advanced promotions like buy one, get one free, or buy three and get one half off with items to keep your customers happy!
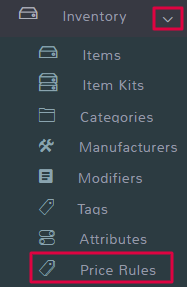
Access the price rules feature by clicking Inventory and selecting Price Rules in the left menu:

Note: Price rules are meant for discounts on items in your store. If you want to apply discounts or promotions on a customer basis such as a rewards program, see Pricing Tiers for more information.
In This Article: #
Creating Price Rules #
To start creating Price Rules, navigate to Inventory in the left menu and select Price Rules.

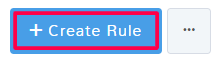
On the left, you’ll see the option to + Create Rule. Click the button to open the Price Rule Information page.
There are several fields to fill in on the Price Rule Information page. Rule Type will add additional fields depending on what you choose. Rule Type, and knowing which one you need to accomplish your goals, is explained in the article on Types of Price Rules. There are other fields that will be available no matter what Rule Type you choose, and they are as follows:
Rule Name
This is the name that will print on receipts for customers and can be used to search for and apply coupon codes if needed.
Description
The description is not customer-facing, it’s just a way for you to keep track of the price rules that you have made, why you made them, and any reminders on how they work.
Start and End Date
If your price rule is for a limited-time promotion, you can enter the start and end date for your rule to take effect. This is not a required field, if you want the price rule to take effect immediately and only end when you choose to inactivate it, you can leave these fields blank.
Location
By default, a price rule will apply to All locations, if you do not want it to apply to every location simply click the checkbox next to the locations you want the rule to take effect.
You may not want the price rules to apply to every location. For example, maybe your California store isn’t moving your winter coat products so you want to have a huge sale at that store to move the product. You may not want that same sale to happen in your Maine store where winter coats are always in demand!
Exclude From Tiers
If you have promotion tiers set up for your store, you may not want conflicting discounts. By default, none of the tiers are excluded from a price rule. Mark the checkbox next to any tiers that you do not want a price rule to interfere with.
If a tier is checked, then the customer who is part of that tier will not have the price rule discounts applied. If you do not check any tiers, then any discounts will apply for both categories. This is important if you have a tier for wholesale customers – you do not want them to get additional discounts on top of their already steep discount. For more information on tiers see the documentation here.
Requires Coupon
By default, all price rules are automatically applied. That means that as soon as a sale is started, the price rule will take effect. If you want customers to provide a coupon code as part of an advertising plan, then check the box to require a coupon. Three new fields will appear below.
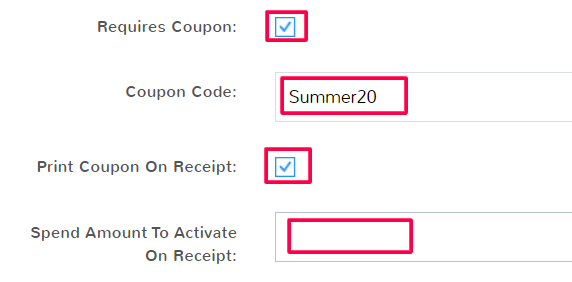
Coupon Code
This is what a customer will have to provide in order for the price rules to apply to their sale. In the example above, the customer would need to provide the coupon code Summer20 in order for the discounts in that price rule to apply to their order.
Print Coupon on Receipt
By default, the checkbox for the coupon to print on the receipt is selected. Even if this is not selected, the coupon will still apply to the order. The price rule Rule Name that the coupon code applies to is what will print on the receipt as well as the amount saved with the discount.
Spend Amount to Activate on Receipt
If you only want the coupon to show on the receipt once a customer has spent a certain amount of money, you can enter that here.
Active
By default, the checkbox is selected to make your price rule active. That means as soon as you Save, your price rule will take effect on sales. If you’re not ready for your price rule to start, you can uncheck the box and come back later.
Keep in mind if you can schedule price rules for specific start and end times with the above Start Date and End Date.
Selecting Groups
You have the option of selecting Items, Item Kits, Categories, Tags, and Manufacturers to apply your price rules to. All of the fields work the same.
Start typing in the field, and a drop-down will appear with available options. Click on the option to apply it. If you make a mistake, you can hit the x next to the option in the field to remove it.
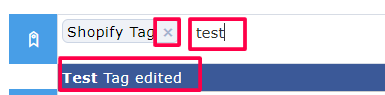
You can select multiple options in multiple fields. For example, if you want to create a 10% discount for all items with the Shopify Tag, as well as for any items in the categories Bags and Shoes, you can! Simply choose them in the Select fields like below.
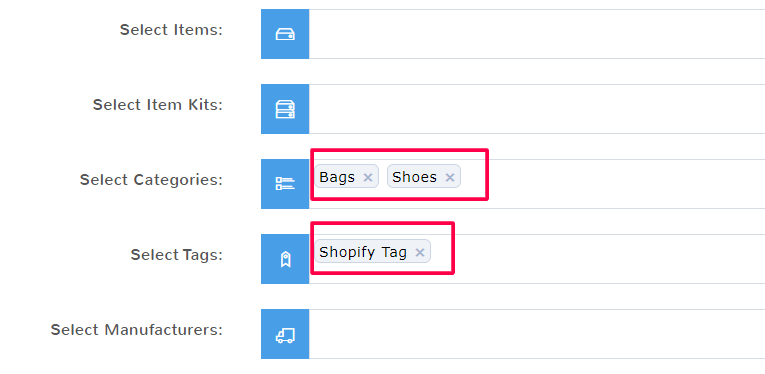
Now any item tagged Shopify Tag, and any item in the Bags or Shoes category will get the price rule discount you created. There is no limit to the number of groups you can apply price rules to.
Note: Be careful when you create price rules. If there is an item that qualifies for more than one price rule, for example, you made a Price Rule for Winter Clothes tag and also have a specific Price Rule for Parkas, only one of those will apply when a parka is sold. Whichever price rule, Winter Clothes or Parkas was created most recently, will apply at purchase.
Edit Price Rules #
To edit Price Rules, navigate to Inventory in the left menu and select Price Rules.

Click Edit next to the rule you wish to update.
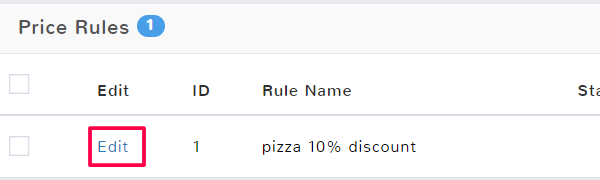
Make sure to click Save in the bottom right of the page when finished with updates.

Delete Price Rules #
To remove Price Rules, navigate to Inventory in the left menu and select Price Rules.
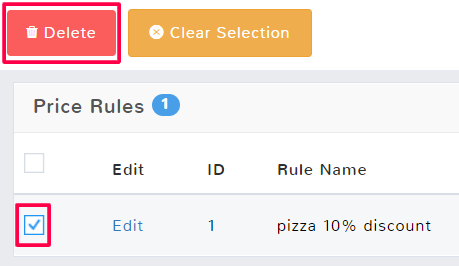
Click the check box next to the price rule that you wish to delete, and then select Delete in the top bar. You can select multiple rules at once by checking more boxes.
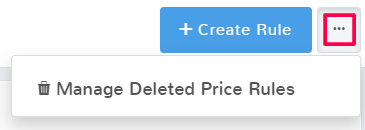
If you deleted a Price Rule by accident, you can recover the rule. On the Price Rule main feature page, click the ellipses (…) in the top right.
Select Manage Deleted Price Rules.
Check the box next to the Price Rule that you want to recover, and then hit Undelete in the top menu. The Price Rule will now appear on the Price Rule main feature page.
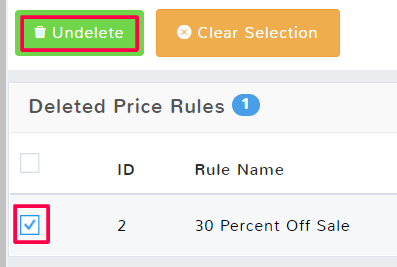
When you are finished click Done in the top right to return to the main feature page.