Introduction #
Purchase orders are essential to inventory in your store.KPOS offers two ways to create purchase orders, manually or automatically with data already in your store. If you don’t have inventory for items tracked, or have not filled out many of the item fields such as replenish or restock levels, you should manually create a purchase order. Manual purchase orders are also useful for exceptional cases, such as knowing you are going to have a larger demand than normal for products and wanting to purchase extras.
Automatically generated purchase orders will take into account your existing stock, the replenish levels you have set, and the usual selling rate of items to create a new order for your suppliers. Read the directions below for more information on setting both up.
Create a Manual Purchase Order #
Navigate to the Receiving main feature page.
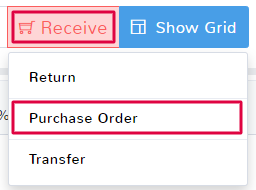
Once the page opens, click the red Receive button near the top and select Purchase Order.
The first thing you need to do is add items to the queue that you want to add to inventory. For more information on adding items to a queue see the article here. After your items have been added, there are two main sections to enter information:
Add a Supplier
Adding a supplier to any receiving is a simple process detailed in the article here.
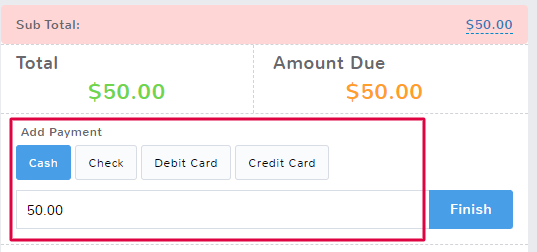
Payment Method Selection
Record the type and amount of payment for the inventory items.
Double-check the fields underneath the payment section:
Change Receiving Date
By default, the date assigned to inventory receiving and all receivings will be when they are submitted. If a different date needs to be selected, click the checkbox and then enter the correct date. See the documentation here for more information about the clock and calendar feature.
Comments
The comment field allows you to make notes on a receiving.
You have two options for your inventory receiving:
Finish
Selecting to finish the receiving will update your inventory and closeout your receiving record. Only do this if you’re sure that you’re done with the record. If you need to edit or print a receipt from this receiving after completing it, see the article here.
Suspend
Once you’ve added items to the receiving, you can select to Suspend it and hold the information without updating inventory. You can find more information about suspended receivings here including how to edit and delete them.
Generate a Purchase Order #
The other way to create purchase orders relies on supplier, inventory, replenish and restock levels having been filled out for items. When all the requisite information has been filled in for items, the software can pull information for what items need to be restocked and generate a purchase order. A summary of the required information for items is below:
-
- Replenish level – the amount that you want to have in stock when a product is reordered. For example, if you have a replenish level of 20, and 5 in stock, KPOS would want to order 15 of an item so that it would be at the replenish level.
- Reorder Level – this is the level at which a notification will trigger, and an item will show up in reports to create a purchase order.
- Suppliers – the source of the items.
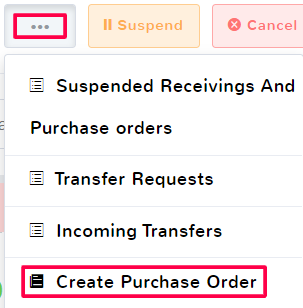
To use this function, navigate to the Receiving main feature page.
Above the supplier section click the ellipses (…) to see more options and select Create Purchase Order.
This opens up a page where you can auto-generate a purchase order for a supplier based on your current inventory levels. In order for this feature to be used to its fullest, all of your items should be assigned to suppliers and must have the replenish and reorder levels filled out.
There are several fields to fill out, and once completed will autogenerate a purchase order. A breakdown of the different fields can be found below:
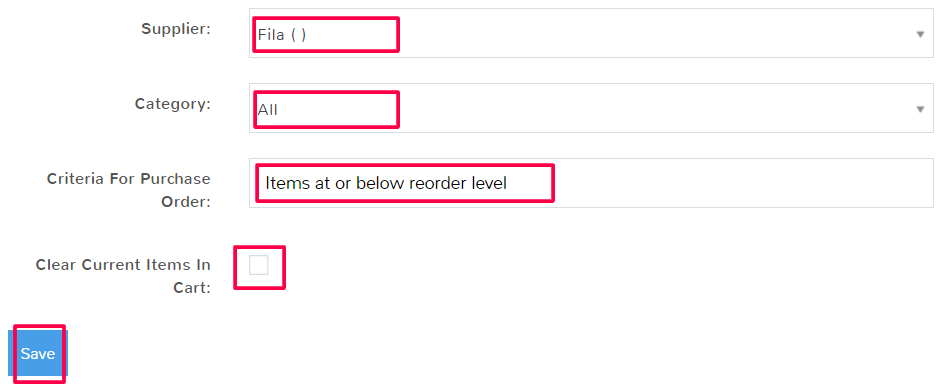
Supplier
This is a required field, you must select one of your suppliers that you intend to purchase items from.
Category
This is an optional field where you can narrow down the items for your purchase order based on the category the item is in. For example, if you only want to reorder items from a supplier that falls under the Winter Clothes category because it’s approaching the season you can select the option here.
Criteria for Purchase Order
This dropdown allows you to decide what items you want to add to the purchase order. There are options based on the replenish/reorder numbers for items, the number of sales in recent history, and more.

If you select one of the options related to reordering level, not that KPOS will automatically fill the quantity of the item needed for it to reach the replenish number. For example, if you have a replenish level of 20, and 5 in stock, KPOS would want to order 15 of an item so that it would be at the replenish level.
Clear Current Items in Cart
If you had already started another receiving, selecting this checkbox will remove any items or information added to replace it with the results of the purchase order you are generating.
Edit a Purchase Order #
If after completing a purchase order you realize there was a mistake, you can open the Receiving page again to make a change and reprint the receipt. On the receiving screen click the ellipsis (…) in the supplier information section and select Show Last Receiving.
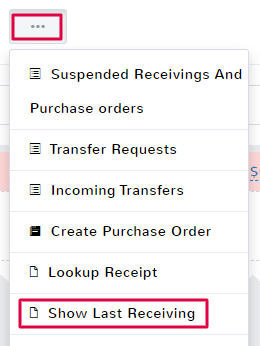
If the purchase order you need to edit was not the last one completed, simply click Lookup Receipt instead. Enter the Receiving ID that you need to edit and then continue with the directions below.
Once the receipt opens, click Edit in the top left corner.
A warning will pop up telling you that any edits will replace the current receiving. Click OK to proceed. You’ll be brought back to the receiving screen where you can then edit any aspect of the purchase order. When you’re done finish the purchase order as you normally would by selecting Finish.


