Introduction #
Items are the building block of your store. Items can be physical products, digital goods, a service, or even a series of services offered to your customers. It’s important to understand all the options when creating items and how to handle and record item inventory for physical products.
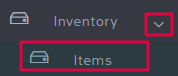
This article gives you a basic overview of all you need to know about items. To view items, click Inventory in the left menu and then select the Items feature.

Create an Item #
When you go to create an item, there are several subtabs with information you can fill out for your new product. Go through each of the tabs to see what information can be added and save as you go. A breakdown of the tabs and the fields available are below.
Item Info Fields #
This tab lets you fill out all of the basic information for your item, the kind of item it is, what it should be called and where it comes from. The fields below all appear in the tab:
Item Name
The title you want to identify the item with.
Barcode Display Name
The name that will print on item barcodes.
Categories
You can select the main and secondary categories that you want your item to be a part of. For more information on categories, see the article here.
Supplier
Select the item supplier in the dropdown. See the article here for information on creating and managing suppliers.
UPC/EAN/ISBN
A space to enter serial numbers if applicable.
Product ID
Enter a number or sequence you’d like to identify the product with.
Additional Numbers
If you have additional serial numbers or other types of information for an item, you can add them here. Click Add item number to add as many additional numbers as you want.
Tags
You can select the tags you want to organize an item with. To create and manage tags, click Manage tags, and see the documentation here on item tags.
Manufacturer
Select the manufacturer of the item. To create and manage manufacturers select Manage manufacturer and see the documentation here on manufacturers.
Descriptions
The description fields let you write out details about your item. The regular description field will display when searching for items in your store. The long description field will populate the description field for your online stores.
Information Popup When Adding to Sale
You can create a message that will appear to cashiers when they add an item to a sale. For example, you may want to remind cashiers about how to safely pack an item during a sale to prevent it from breaking.
Weight and Dimensions
If you ship items, you should note the weight, weight unit, and dimensions of a product to correctly calculate shipping.
Default Quantity When Selling Or Receiving
If you always purchase or sell items in a specific number – for example, you always receive and sell baseballs in packs of 3, you can enter that number here. This way when a baseball is added to a sale, or to a receiving, it will automatically have the quantity of 3.
Inactive
This means an item is not currently being sold. Checking this box will hide an item from your eCommerce stores.
Is Barcoded
Check this box if the item has a store barcode on it.
Is Favorite
Check this box if you would like an item to appear in the Favorite section of the item queue grid. For more information on the item queue see the documentation here.
E-Commerce Shipping Class
Click the dropdown to select shipping options for the item on your eCommerce store. These shipping classes can be set up in Store Config.
Sold in a Series
Check this box if the item can be sold as part of a series. For example, you may sell a series of 5 haircuts that can be used within a year at your barbershop to encourage repeat business. The Series Quantity would be 5, and the Number of Days Series Must be Used Within is the time limit the customer has to redeem the series within, which would be 365 days. For more information on series items, see the documentation here.
Is Service
Check this box if the item is a service and not a product. This lets the system know there is no inventory to keep track of and helps you run accurate reports.
Is Ecommerce Item
Checking this box will make an item appear on your integrated eCommerce stores.
Allow Alt Description
Check this box if you want an alternate description to display for an eCommerce item, meaning that what is entered in the eCommerce software is what will display.
Item has Serial Number
Check this box to display a new area where you can Add Serial Number. You can add multiple serial numbers for an item and have the option to add the serial number to inventory as if it is a separate item with its own cost and price.
If you have created any custom fields for items, those options will display in the bottom area. When you have finished with the section, click Save and you will be brought to the next tab.
Item Variations #
Here you can customize items to be sold in different quantities, variations, and modifications. Reference the articles on Quantity Units, Variations, and Modifiers for more information. When you have finished with the section, click Save and you will be brought to the next tab.
Item Pricing #
Item pricing with POS can be as nuanced or as simple as you want. When creating or editing an item, you will see various options for setting item prices. See the article here for a breakdown of these fields.
Remember that item pricing can also be affected by item location and Pricing Rules.
Item Inventory #
The inventory fields are essential to keeping track of your store items and auto-generating purchase orders for items. See the article here for more information on item inventory.
Images #
Here you can upload images to help identify your items. Click Choose File to upload an image from your device. When you have finished with the section, click Save and you will be brought to the next tab.
Item Locations #
Here you can set the location, inventory stocking, prices, and taxes for an item based on what location it is in. If you only have one location, there will only be one option for the item settings, if you have multiple locations you can set the following fields for each location:
Do Not Sell at This Location
Checking this box will hide an item from the selected location. Cashiers will not even see the item in the search or grid when completing sales or inventory.
Location at Store
This is a helpful spot to note where you can find an item in a store location for stocking and customer service purposes.
Reorder Level
This will override the level set in the Inventory tab for that specific location.
Replenish Level
This will override the level set in the Inventory tab for that specific location.
Hide From Grid
Checking this will keep an item from appearing in that location’s item queue grids. You will still be able to find the item by scanning the barcode or searching for it, however.
Override Prices
This will override the prices set in the Pricing tab for that specific location.
Override Default Tax
This will override the default taxes you have set up for your stores. Tax settings for an individual item in a location will override all other tax settings, so use caution when setting these up. For more information on taxes, see the documentation here.
Edit an Item #
To edit an item, click Inventory in the left menu and then select the Items feature.
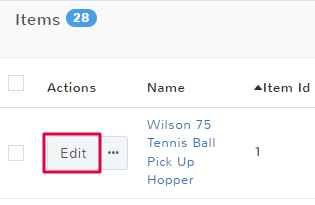
Either search for or scroll to find the item that you want to edit. Click Edit in the Actions column for the desired item.
The item info page will open up. Edit the desired information and click Save in the bottom right to keep your changes. You will have to save changes made to each of the different submenus of an item individually.
To return to the main page, click Done.
Clone an Item #
If you need to make a new item that is similar to an existing one, you can simply clone an item and all of its information. To clone an item, click Inventory in the left menu and then select the Items feature.
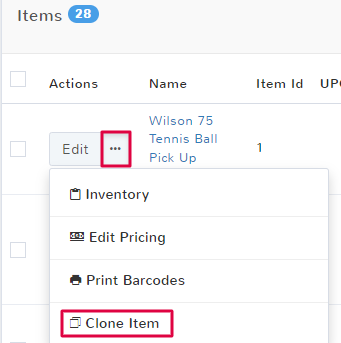
Either search for or scroll to find the item that you want to copy. Click the ellipsis (…) in the Actions column for the desired item and select Clone Item.
The item creation screen will open with all of the copied information. The Item Name will have (cloned) appended to it. Edit any of the desired information, and click Save to keep your cloned item.
Delete Items #
To delete items, click Inventory in the left menu and then select the Items feature.

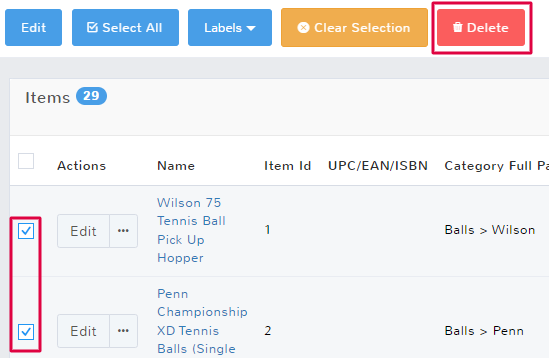
Either search for or scroll to find the items that you want to delete. Click the checkbox next to the items you want to delete, you can select one or multiple items. To select all of the items on the page, click the checkbox in the header.
Once you have selected the items, a menu will appear above the item list. Select Delete in the new list.